Spectrum Design Group

Author name: Renee

Interior Design Process

From Blueprint to Reality: Understanding the Interior Design Process

Updating your home can be one of the most rewarding yet overwhelming experiences, especially when it involves an interior design remodel. You may dream of the finished product and wonder how to bridge that gap.  Understanding the interior design and build process can help you feel empowered as you start working with your interior designer. The Phases of Interior Design One of the most important aspects of interior design is planning. Many homeowners mistakenly think they can jump straight into aesthetics. We often have to redirect clients to function at the beginning of the project because how it will look at the end is the most exciting part. However, understanding the layout and how you’ll use the space is necessary before diving into finishes. Understanding the design process can demystify what often feels like a complicated undertaking. We follow a structured approach consisting of three main phases: planning, specifications, and pre-construction, followed by the construction phase. Planning Phase During the planning phase, we focus on the functional use of your space. This is the time to address any functional problems and ensure the new layout aligns with your plans for using the space.  For example, if you enjoy entertaining, we might design your kitchen to be functional for cooking while incorporating seating for guests to visit with you as you work. Specifications Phase Once we’ve addressed the layout and functional needs, we move on to the specifications phase. This is where we select finishes—everything from plumbing fixtures and lighting to paint and cabinet finishes. This phase transforms the space into something visually appealing. Pre-Construction Phase In the pre-construction phase, we gather pricing and estimates to assemble a construction proposal. At this point, we share this proposal for your consideration, marking the end of the design phase.  If you decide to proceed, we order materials and draft a construction schedule that accounts for lead times and the availability of subcontractors. Construction Phase Finally, we enter the construction phase. We work closely with our subcontractors throughout this process to keep everything flowing smoothly. We provide weekly updates on what’s accomplished and what’s coming next.  As we approach the project’s conclusion, we conduct a walkthrough to ensure all work is executed according to the design. We’ll create a punch list to address the final details before handing you your beautiful new space. Common Misconceptions In Interior Design As you embark on your remodeling journey, it’s important to dispel some common misconceptions about the design process. Function Comes First Many homeowners want to jump into finishes too early. While initial conversations about the look and feel of a space are helpful, the functionality should be agreed upon first.  In our first planning meeting, we intentionally leave our 3D models white so no one is distracted by finishes. It’s all about ensuring the space works for you before we dive into the aesthetic details. Iterative Feedback Client feedback is vital throughout the design phase. After meetings, we post deliverables for review. Each phase builds upon the next so it’s important clients provide feedback along the way. This can help them avoid potentially time-consuming and cost-prohibitive changes down the road. An iterative process allows for collaboration, ensuring client needs are met as we progress. Budgeting for an Interior Design Project Cost Breakdown When budgeting for your remodel, it’s essential to recognize that the design and construction phases are separate. During the design phase, you can expect to pay an hourly rate for services. We’ll initially provide a high-level estimate, but the final bill will reflect the work done. During the renovation phase, we present a fixed construction contract that incorporates all known costs going into the project. Allowing some room in your budget for unknowns is always a good idea. Communication Between Homeowners and Designers Effective communication is the backbone of a successful remodeling project. When we first meet, we like to chat with you to understand your lifestyle. Do you love to cook? Are you looking for materials that withstand the wear and tear of kids and pets? Knowing your day-to-day helps us design a space that truly serves you. We encourage you to share any specific looks or feels you’re drawn to. Some clients come armed with inspiration photos, while others prefer to lean on our expertise. Either way, collaboration is key. Throughout the process, we communicate regularly, provide updates, and seek your input to ensure the design aligns with your vision. Designing for Real Life Once we start discussing finishes, we make sure they fit your lifestyle. For instance, if you prefer low-maintenance materials, we won’t recommend light-colored carpeting or delicate textiles. It’s about finding that sweet spot where aesthetics enhance the function and vice versa. Trends vs. Timelessness When choosing finishes, it’s essential to consider your home’s architectural style. The best designs feel appropriate and comfortable for the client while also fitting with the home’s character. We aim to create timeless spaces you will love for years, not just trendy looks that may quickly feel outdated. Create a Space that Honors You Understanding the design-build process is key to successfully updating your home. Focusing on collaboration and communication, in addition to form and function, helps clients have the least stressful and most enjoyable experience. Are you ready to turn your vision into reality? Embark on your remodeling journey today, and let’s work together to create a space that feels uniquely yours.

Exterior Shutters Are More Often Wrong than Right

Exterior Shutters Are More Often Wrong than Right

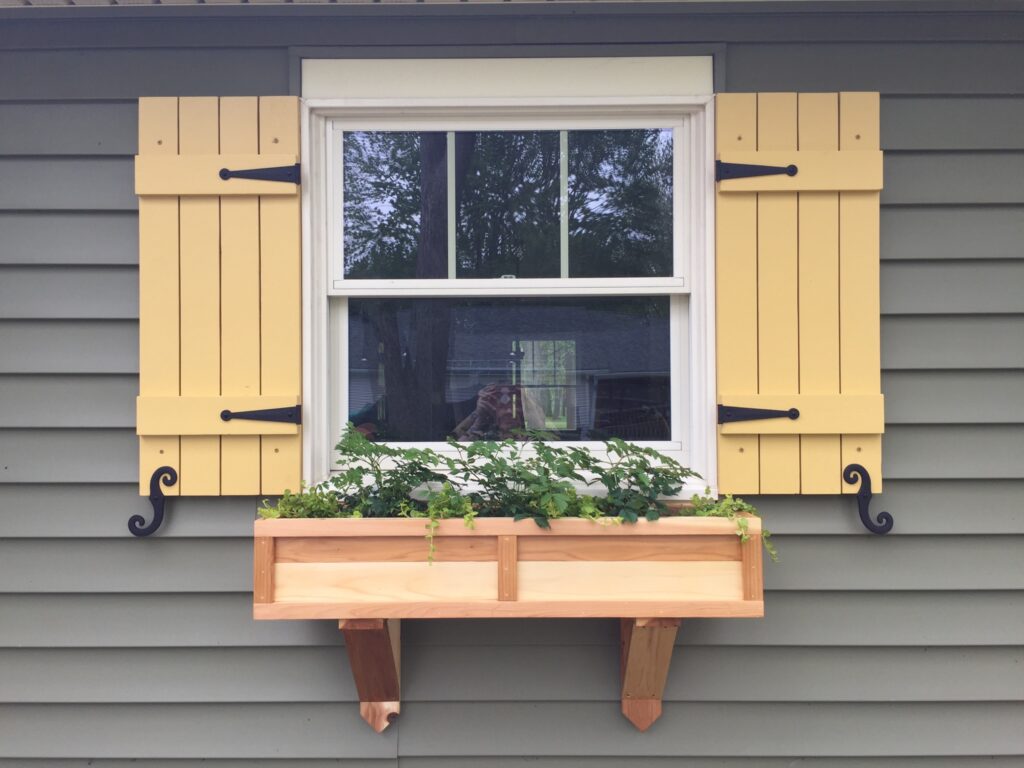
As the air turns crisp and the leaves begin to change, it’s the perfect time to refresh your home’s exterior. The vibrant hues of fall are inspiring and offer an opportunity to bring new life and warmth to your property. After the summer’s heat and the fading colors of late summer, it’s time to introduce some seasonal charm to your home. This year, let’s focus on how to enhance your home’s curb appeal as autumn approaches. The Appeal of Exterior Shutters Adding or refreshing exterior shutters is one effective way to update your home’s exterior this fall. Shutters can dramatically increase your home’s architectural interest while providing a beautiful pop of color against the backdrop of fall foliage. However, before you dive into this project, ask yourself a few key questions. Do My Windows Suit Exterior Shutters? Consider the style and size of your windows to ensure that shutters will look appropriate in your home. Ideally, exterior shutters should cover half the window width when closed and match the window’s height. Proper sizing is crucial for achieving an authentic look, even if the shutters aren’t functional. Keep in mind that not all windows are suitable for shutters. For instance, windows that are wider than they are tall generally shouldn’t have shutters. Similarly, casement windows that open out or bay windows typically do not accommodate shutters well. Is My Home’s Style Compatible? Understanding your home’s architectural style is vital when considering exterior shutters. Stroll through your neighborhood or do a quick online search to see which shutter styles complement homes like yours. This can help you avoid common pitfalls—like selecting shutters that clash with your home’s character. For vintage or historical homes, resources like Timberlane offer comprehensive guides on matching shutters to specific architectural styles, while sites like Old House Guy provide insights specifically for older homes. Moving Forward with Confidence If you feel confident that your windows are suitable and your home’s style can accommodate shutters, you’re ready to take the plunge! The right exterior shutters enhance your home’s aesthetic, making it appear thoughtful and timeless. However, improperly applied shutters can detract from its charm. Take inspiration from beautiful installations, such as custom-built shutters that perfectly match a cottage-style home, complete with bespoke flower boxes. This kind of attention to detail elevates the home’s look, evoking a cozy, inviting atmosphere that makes you want to sip cider on the porch while enjoying the fall scenery. Adding Functional Elegance To maximize your shutters, consider making them operable or give the illusion of functionality. The right hardware can enhance their aesthetic appeal. Companies like House of Antique Hardware and Hooks & Lattice offer a range of options, while Rejuvenation provides exquisite classic pieces that can add a charming touch to your shutters. If Exterior Shutters Aren’t Right for You What if you’ve determined that shutters aren’t the best choice for your home? Don’t worry! There are numerous other ways to refresh your exterior this fall without going the shutter route. Here are some ideas to inspire your curb appeal transformation: Change Your Front Door Color One of the simplest ways to make a dramatic change is by repainting your front door. A rich, warm color like deep red, forest green, or even a crisp navy can create a striking contrast against the autumn landscape. It’s a low-risk, low-commitment upgrade that can dramatically enhance your home’s appearance. Refresh Your Accessories Small accessories can help change how you feel about your home. Consider updating planters with seasonal flowers or ornamental grasses. A cozy welcome mat can set the tone for your home, and swapping out a builder-grade mailbox for something more personalized can elevate your exterior. Don’t forget to think about house numbers, which can be an opportunity to express your style with unique designs. Update Your Exterior Lighting With the days getting shorter, enhancing your outdoor lighting becomes more essential. Upgrading to standout fixtures improves your home’s aesthetics and safety during the darker evenings. Consider adding landscape lighting to highlight paths, trees, or other beautiful yard features against the autumn backdrop. Embracing the Seasonal Change As the leaves fall and the air cools, embrace the change by sprucing up the outside of your home. There are countless ways to enhance your home’s curb appeal to reflect the beauty of fall. If you feel overwhelmed or uncertain about where to start, don’t hesitate to contact us. Many designers also consult on exterior projects and can provide tailored suggestions to enhance your home’s charm—whether you incorporate shutters or explore other options. Autumn is a wonderful time to reinvigorate your home’s exterior. With a few thoughtful changes, you can make your home stand out in your neighborhood and welcome the season with open arms. Embrace the beauty of fall and let your home shine!

Spectrum Design Group - Guide to Working with an Interior Designer

Your Guide to Working with an Interior Designer

Working with an interior designer can transform your living space from functional to fabulous, but understanding what they do and how they differ from decorators is crucial when embarking on a design project.  Whether renovating a single room or undertaking a whole-home makeover, here’s what you need to know about interior design, working with a designer, and what to consider when choosing the right professional for your project. What Is Interior Design? Interior design is the art and science of enhancing a building’s interior to create a more functional and beautiful environment. However, it’s about more than just aesthetics.  While interior design certainly focuses on making a space beautiful, it’s also about creating a functional and efficient space that meets your needs. One of the most important aspects of interior design is space planning, which involves creating a layout that maximizes the functionality and flow of a space.  Finishes are also important as they can affect mood and set the tone for a space. It’s important to choose colors that complement each other and fit the style and purpose of the room.  Lighting is another crucial aspect of interior design. It creates ambiance, highlights design elements, and affects how colors and textures are perceived. Interior design requires attention to many small details, from selecting the right cabinet hardware to choosing the perfect bathroom towel rings, bars, and robe hooks.. Every detail counts when it comes to creating a cohesive and beautiful environment.  Overall, interior design is concerned with ensuring a home’s fixed elements serve the people using it. Creating a beautiful and functional space requires creativity, technical skills, and attention to detail. What Is an Interior Designer? An Interior designer is trained in architecture, design, and building codes and can help with space planning, structural changes, and construction. They combine artistic flair with technical expertise to enhance residential or commercial environments’ functionality, safety, and beauty.  Unlike interior decorators, who focus primarily on aesthetics and furnishings, interior designers are trained to handle structural changes or major renovations.  If you are doing a larger project that involves major renovation, it may be best to work with an interior designer.  What Is an Interior Decorator? While both interior designers and decorators enhance the appearance of spaces, their roles differ significantly in scope and expertise. Interior decorators specialize in furnishings, fabrics, and aesthetics, focusing more on surface-level transformations and decor choices. An interior decorator may be the best choice if you primarily focus on decorating an existing space, such as updating the furniture and décor.  Ultimately, the decision to hire an interior designer or decorator will depend on your specific needs and the scope of your project. Researching and interviewing potential professionals is essential to finding the right fit for your project. What to Expect from Working with an Interior Designer An interior designer helps transform your living space into a functional and aesthetically pleasing environment. When you engage an interior designer, you tap into a wealth of knowledge and creativity to transform your vision into reality.  They’ll start by understanding your needs, preferences, and lifestyle to create a customized design plan. Expect thorough consultations, detailed space assessments, and collaborative discussions to refine your design goals.  A good designer will guide you through material selections, color schemes, furniture layouts, and lighting plans, ensuring that every aspect aligns with your aesthetic preferences and functional requirements. Once the design work is completed, some interior designers will manage the construction phase of your project (we do!).  Overall, an interior designer provides you with the expertise, creativity, and resources necessary to create a beautiful and functional environment that reflects your unique style and meets your specific needs. The Interior Design Process Our approach to interior design is comprehensive and client-centered. We begin with an initial consultation to discuss your project scope, budget, and timeline. This phase is crucial for understanding your vision and establishing clear objectives. Following this, we conduct a detailed assessment of your space, considering architectural features, existing furnishings, and structural considerations. The design development phase involves conceptualizing layouts, selecting materials, and presenting design proposals tailored to your preferences. We collaborate closely with you, refining designs based on your feedback until we achieve a concept that exceeds your expectations.  Once the design is finalized, we move into the implementation phase, where we manage the project from procurement and construction oversight to final installation and styling.  Our goal is to ensure a seamless transition from concept to completion, delivering a space that reflects your personality and enhances your lifestyle. Managing the Entire Project Beyond design conceptualization, many interior designers offer project management services to oversee every aspect of the implementation phase. This includes coordinating with contractors, managing timelines and budgets, and ensuring construction meets design specifications.  By taking on project management responsibilities, designers streamline the process for clients, alleviating stress and ensuring that the final result aligns with the approved design vision. Questions to Ask an Interior Designer When selecting an interior designer for your project, it’s essential to ask the right questions to ensure a good fit and a successful outcome: What is your design philosophy and style? Look for an answer that aligns with your preferences and your desired functionality. A professional designer should articulate a clear philosophy that resonates with your vision for the space. Can you provide examples of past projects similar to mine? Ideally, the designer should showcase relevant projects demonstrating their ability to handle similar challenges and achieve desired outcomes. Pay attention to the quality of work and whether it matches your expectations. How do you charge for your services, and what is included in your fee? It is important to have a transparent answer detailing whether they charge a flat fee, hourly rate, or percentage of the project cost. Also, understand the services included in this fee, such as design concepts, procurement, and project management. Do you have experience working within my budget range? The designer should have experience working across various budget ranges. They should discuss managing costs,

A Guide to Choosing the Perfect Fire Pit

Creating a Backyard Oasis: A Guide to Choosing the Perfect Fire Pit

As the weather warms and the days stretch longer, the allure of spending evenings under the open sky grows stronger. Transforming your backyard into a cozy haven with seating and a fire pit not only enhances the ambiance but also extends the functionality of your outdoor space.  These extensions of our homes can quickly become some of our favorite places to spend evening hours. I enjoy starting a bonfire, roasting marshmallows with the kids, or chatting with friends on summer nights. Staring at the flames while sitting under the stars is so relaxing! I’ve learned recently that if you’re looking to add some of this cozy ambiance to your outdoor space or upgrade your current fire pit setup—whether for a balcony or sprawling deck—there’s likely an option available. Below is a guide to help you figure out the who, what, where, why, and how of fire pits. I’ve also shared some of my personal favorites. Why Install a Fire Pit? Fire pits are more than just beautiful features; they are centers of social and familial gatherings. It can be a perfect spot for gathering with friends and family for a night of storytelling, laughter, and relaxation while providing a source of warmth that allows you to enjoy your outdoor space longer into the evening and during the cooler months.  But it’s not just about social gatherings. You can also use your fire pit to make s’mores, grill burgers, or cook a full campfire meal. They serve as an attractive focal point in your backyard, adding a touch of style and sophistication. Choosing the Right Location The placement of your fire pit is crucial for safety and enjoyment. Place the fire pit at least 10 feet away from house structures or flammable materials. Ensure the area is open and has good ventilation to avoid smoke accumulation. Consider prevailing wind patterns to avoid smoke blowing into your home or seating area and position it where you can enjoy the best view of your garden or the stars. Lastly, ensure the fire pit is easily accessible and has ample comfortable seating space. Wood-burning Fire Pit A wood-burning fire pit is ideal for the authentic campfire experience. It is perfect for areas where wood burning is allowed, and you enjoy the crackle and smoke of real wood.  It is generally the most economical choice and is relatively straightforward to set up. Assuming you’re allowed to burn in your neighborhood, you choose a safe location to set up and stack the logs inside before lighting a fire. Attractive options are available in both traditional and smokeless varieties. This modern Corten steel option is handmade and would elevate any outdoor space. Some smokeless fire pits like this one by Solo Stove have removable ash pans for easy cleaning. If you are using wood, ensure that where you store it is clean and covered. You don’t want to burn wet wood.  Propane Fire Pit If you’re looking for a fire pit option that doesn’t involve smoke and flying sparks and doesn’t require a permanent installation, a propane fire pit is a good option. Propane pits are cleaner than their wood-burning counterparts. Additionally, they are portable, can produce as much heat as a standard patio heater, and come in various styles.  Ecosmart’s Ark 40 boasts a minimalist architectural design. For all their conveniences, however, one downside to some propane fire pits is that not all styles elegantly hide the propane tanks that fuel them. One noteworthy exception is this sleek and colorful option from Loll Designs, which is stylish while keeping the propane completely self-contained. Natural Gas Fire Pit If you’re ready to commit to a permanent enhancement for the patio, a natural gas-burning fire pit may be the way to go. These fire pits require a dedicated gas line installed by a professional.  While this adds to the setup cost and complexity, using a natural gas fireplace is a snap once they’re in place. There’s no need to worry about keeping fuel hand or fear of running out mid-fire.  These fire pits burn cleanly and produce significant warmth, which might be attractive as summer turns to fall. There are many gorgeous options out there. Some vendors, like Lumacast, offer white glove delivery and setup, lessening the setup barrier.  I love Lumacast’s sculptural Paolo model. Paloform’s Fold and Kodo fire pits are other options that would give any outdoor space an edge. Bioethanol Fire Pit Bioethanol fire pits are among the most versatile options and are often selected for this flexibility. They vary greatly in size and style and can be burned indoors or outdoors. Many are even designed to sit on a tabletop.  Manufacturers tout the fire pit’s environmentally friendly fuel source, which is derived from plant by-products and releases no harmful emissions. Fuel sources come in liquid or gel form, depending on the fire pit. These fire features don’t put off nearly as much heat as other fire pits, making them an option for small spaces or where traditional wood-burning fire pits aren’t allowed.  One of my favorite options in this category includes this retro fireplace by Modfire, and its little sister, the Mini-Mod. Both have a fun vintage mid-century look and come in great colors. Adding a Fire Pit to Your Outdoor Space A fire pit is a wonderful addition to any outdoor space, offering functional and aesthetic benefits. You can create a delightful outdoor retreat in your backyard by choosing the right type, location, and safety measures. Whether roasting marshmallows on a summer night or enjoying a warm drink on a crisp fall evening, a fire pit can make any outdoor gathering magical.

Partnering Effectively with Your Design Team

Partnering Effectively with Your Design Team

Once you’ve decided to renovate a part of your home that’s not working, you want to hit the ground running. We get it! Each day spent in a dated, dysfunctional kitchen or a cramped, dim bathroom feels increasingly cumbersome. While your design team typically has preferred methods for navigating the design process efficiently (see SDG’s process for an example), clients play a crucial role in maintaining momentum and progress.  Have a united front. As a design team, we’re here to listen to your needs and develop solutions catered to you and how your family lives. That job is much more difficult when we hear different priorities from partners within the same household! Nothing slows down a process like lack of focus. Discuss overarching design goals with your partner before engaging a designer to maintain focus. While specifics, like stained versus painted cabinets, can be determined later, clarity on whether to renovate the kitchen or bathroom is essential from the outset. Communicate your needs clearly. It’s essential that your design team understands your practical requirements for the space you’re renovating. Whether it’s more counter space, a larger pantry, a coffee bar, or a sink in your island, share your non-negotiables immediately. Leaving your designer to guess your functional needs can lead to design rework and a prolonged design phase. Tell your designer what you want to spend. In the world of renovation, the sky is the limit. Having frank conversations about budget throughout your project is a fantastic way clients can help keep things on track. If you aren’t sure what a reasonable cost for your project might be, your design team should be able to listen to your goals and give you a budget range. If you started the design phase without a clear understanding of cost and needed to work with your designer to set a reasonable budget, loop back to item number one on this list and ensure your partner is on board before moving forward. Having your designer over (or under) design your space doesn’t serve anyone. Lean into the process. Most designers have figured out how they like to work. Ask them about it! Understand their phases of design, the expected outcomes of each phase, and what the deliverables will look like. Find out when you’ll need to be available to meet with your designer—either in your home or at their office—and put these dates in your calendar immediately. The process can’t move forward if you aren’t available. Do your part, too! Your design team will work diligently to meet the requirements of your project. They’ll strive to select the right paint colors, flooring, plumbing fixtures, and pendant lamps to create the perfect atmosphere for your space. However, they can’t do it alone. When your designer asks for feedback, provide it promptly and honestly. Don’t hesitate to share your thoughts if you have strong feelings about something they suggest.  Trusting your design team and giving them enough space to do their best work is always appreciated, but design is a collaborative process. Stay involved and enjoy the experience. Work on the same team as your designer; before you know it, it will be time to start planning for construction.

Roux and Neko

Furniture Made for All Family Members

My family adopted two miniature poodles this spring. Meet Roux, the mild-mannered apricot-colored fluff ball who loves watching pet-focused reality TV, and Neko, his scrappy, dark-coated brother who has an insatiable zeal for treats and has never met a stranger. This adorable pair has kept us on our toes and, for the first time in our lengthy pet-owning experience, convinced us that they should be allowed on the sofa. We’re not sure if the stumpy tail wags, literal puppy-dog eyes, or the pleading of our kids convinced us this was a good idea. However, we are glad that, given the circumstances, we considered more than good looks last fall when we chose our new family room sofa. Pet-Friendly Furniture Tips If you, like us, share your home with four-legged family members, here are a few things you might remember when shopping for pet-friendly furniture: Look for furniture with solid construction. If your pets (or kids!) launch on and off each day, flimsy furniture may need to be replaced sooner than anticipated. Go with coated leather upholstery if you have a pet that sheds a lot. If constant lint rolling or vacuuming your upholstery, isn’t your idea of fun, fur doesn’t stick to coated leather! If you prefer fabric upholstery, read up on pet-proof options. Velvet, chenille, microfiber, and outdoor fabrics are among the top performers. Consider buying furniture the same color as your pet – for obvious reasons. If you have cats, invest in multiple, sturdy scratch posts. Ensure they don’t move when your cat scratches them, and “train” your cat to use them by sprinkling them with cat nip. This doesn’t guarantee the cat won’t scratch the sofa, but it doesn’t hurt to try! Of course, if you’re a dog owner, you could also train your pup to stay off the furniture, but really, who doesn’t want to snuggle into a poodle pile and watch some Lucky Dog?

On the Seventh Day of Christmas: Seven Interior Design Blogs to Read

On the Seventh Day of Christmas: Seven Design Blogs to Read

On the seventh day of Christmas, we give you: Seven Interior Design Blogs to Read, Six Festive Cocktails, Five Holiday Wishes, Four Tips for a Successful Renovation, Three Blogs Not to Miss, Two New Traditions, and One Room to Refresh. If you’re like me, the combination of more time spent indoors during winter along with holiday season “downtime” often turns into a push to complete (or even just start) a home improvement project I’ve been thinking about for months! On Day 7 of our 12 Days of Christmas series, I share with you seven of my favorite sources of design inspiration from across the web. 7. The Design Files Though it aims to be “Australia’s Go-To Design Destination,” The Design Files’ posts are definitely relevant to those of us not living down under! The blog is full of gorgeous home tours, architecture, and interior posts sorted into useful categories that make it easy to find just the right inspiration – minimalist, family, coastal, etc. 6. Mad About The House Mad About The House features the pragmatic and engaging content of Kate Watson-Smith, a journalist turned design blogger and consultant. Kate’s posts are as personable and entertaining as they are informative. Her recent thoughts on the need to push past the desire to attain perfectionism in our homes got me thinking. 5. House Beautiful House Beautiful’s online presence is every bit as satisfying as its print edition. It’s packed with design inspiration for every style and every room of the house. Once your interior is situated, extend your home outdoors with House Beautiful’s inspiration for the garden. 4. Design to Inspire Put together by a Canadian and Australian team, the posts on Design to Inspire are focused on homes across the globe. Their content is a delight to scroll; it’s light on words and heavy on dazzling photography. 3. Yellow Brick Home Yellow Brick Home follows the renovations of DIYer couple Kim and Scott. The couple covers five renovations in-depth, often sharing what they’ve learned and why they made the design decisions they did. Check out some incredible Before and After galleries. 2. Style by Emily Henderson From luxury renovation projects to high-end looking DIYs, Emily, and her crew at Style by Emily Hendersen cover all the bases in posts that are helpful and a voice that’s friendly and authentic. Also, if you’re still after last-minute gift ideas, I found Emily’s gift guides this year to be spot on! 1. Cup of Jo Though not expressly an interior design blog, Cup of Jo has featured some of my personal all-time favorite house tours. The interviews accompanying the tours offer glimpses into the lives of the home’s occupants that enhance the tour as much as the photography. Cup of Jo’s weekend link lists have been a staple of my weekends for years! Now it’s your turn. What are some of your go-to blogs for inspiration?  

On the Fourth Day of Christmas: Four Tips for a Successful Renovation

On the Fourth Day of Christmas: Four Tips for a Successful Renovation

On the fourth day of Christmas, we give you: Four Tips for a Successful Renovation, Three Blogs Not to Miss, Two New Traditions, and One Room to Refresh. If you’re like many homeowners, once the decision to start a home renovation has been made, you’re eager to begin as soon as possible. The months or even years of living in a space not well-suited to your lifestyle have taken a toll, and you want to make forward progress right away! While we understand the desire to roll up one’s sleeves and jump in, slowing down and taking a little time to consider the following four tips allows homeowners to start their renovation with a foundation as solid as the one their home is built on and to move through the project with confidence and grace. In fact, three of the four tips are for before construction even begins! This highlights how important it is that homeowners take their time preparing and planning for what will undoubtedly be a large investment of both time and resources. 1. Make it personal – Start with a solid plan personalized for your lifestyle. Reflect on what made you even want to do a renovation in the first place. If it helps to clarify things, write down your goals for the final renovated space. Think about functional needs before you think about aesthetics. What really needs fixing? Do you need more pantry space? Is your kitchen too dark? Does the soaking tub in your bathroom take up too much valuable real estate? Consider the needs of your family and make sure you can communicate clearly the problems you’re trying to solve with any partners you’re working with. After you have a solid grasp of functional needs, it’s time to think about aesthetics. Consider what overall look and feel you’d like your home to have. Do you have your heart set on creating a modern and minimalist space, or does the architecture of your home lend itself to a more classic but cozy feel? Think about colors you love, any specific materials you’re interested in, and where in your home it feels reasonable to splurge vs. save. A top priority for a family with young kids and pets might be a durable tile kitchen floor while a recent retiree might finally install the blond wide plank wood floors they’ve been dreaming of for years. Now is the time to gather your Instagram or Pinterest inspiration and use it as a tool to communicate your functional and aesthetic needs to the designers and/or contractors you’ll be partnering with. 2. Work with the right people – Form a solid team you can trust. Speaking of partners, engaging the right people to help with your project is key! If the thought of being able to define your overall project makes you sweat, engage the help of a design professional to walk you through. A qualified design professional will have an established process. They will get to know you by visiting you at your home and asking lots of questions about your needs, lifestyle, and budget. They’ll listen carefully and will use this input to design for your practical needs and visual preferences. They will also produce design deliverables useful to contractors. Additionally, make sure you work with trusted contractors. Ask friends and family who they have worked with and what their experiences were like. Interview potential contractors to get a sense of their personalities and to ask questions about how they approach their work. Look at their portfolios online or ask them to send you photos. You can also ask for references. An alternate option is to work with a design-build firm that will work with you on the design process and then manage the construction from start to finish. Working with a design-build firm means you’ll have a partner all the way through the project. 3. Be prepared – Start preparing well before the demo crew shows up. Once you’ve designed for the end goals of your project and have engaged the right team to help you get it done, being prepared includes both taking the practical steps you’d expect to prep your space, as well as adjusting your mindset to help you manage the inevitable ups and downs that will present themselves along the way. First, decide where you’ll set up a temporary kitchen and construction-free zone where your family can relax, prepare simple meals if your kitchen will be out of commission, and eat. Gather everything you’ll need for this area – this might include a microwave, electric kettle, and other small appliances. Also, decide where you’ll put your refrigerator in the short term. After items needed for your temporary kitchen are set aside, plan to pack up furniture and personal items in your space. Move out everything you can and store your things in another part of the house. This prevents your items from getting dirty or damaged, and it makes contractors more efficient as they aren’t working around obstacles, moving them about the space, or needing to spend time taking extra precautions required to protect your things. Aside from these pragmatic steps, managing your own expectations can also be a help. Despite all your preparations, things will not go according to plan. Expect to be flexible and to pivot as needed as work gets underway. Be prudent and structure your project with flexibility built into your timeline. Also, set aside additional funds to address unexpected costs that arise. Even the most thorough planning won’t help you predict hidden complexities. Finding old wiring that must be brought into code compliance, insufficient insulation, or mechanicals in locations that don’t work for your new plan are all common problems. Unexpected material delays are another. Expecting challenges to arise will allow you to respond in a more confident and timely manner when they inevitably do. 4. Communicate effectively with your team – Be a good client. As you can tell, we value planning and preparation when it comes

Scroll to Top